1. Introduction
GR8 CRM is a set of Grails Web Application Framework plugins that makes it easy to develop web applications with CRM functionality.
You can find more information about GR8 CRM on the main documentation site http://gr8crm.github.io.
1.1. Customer Relationship Management
Customer relationship management (CRM) is a system for managing a company’s interactions with current and future customers. It involves using technology to organize, automate and synchronize sales, marketing, customer service, and technical support. Wikipedia
The GR8 CRM "Ecosystem" currently contains over 40 Grails plugins. For a complete list of plugins see http://gr8crm.github.io.
Each GR8 CRM plugin defines a Bounded Context that focus on one specific domain, for example contact, project or document.
2. Campaign Management Plugin
This plugin provide storage and services for managing many types of campaigns in GR8 CRM applications.
Note that this plugin does not contain any user interface components. This plugin contains domain classes and services only.
The plugin crm-campaign-ui provides a Twitter Bootstrap based user interface for managing campaigns.
crm-campaign-ui depends on crm-campaign so you only need to include crm-campaign-ui
in your BuildConfig.groovy if you want end-user campaign management features.
3. Domain Model
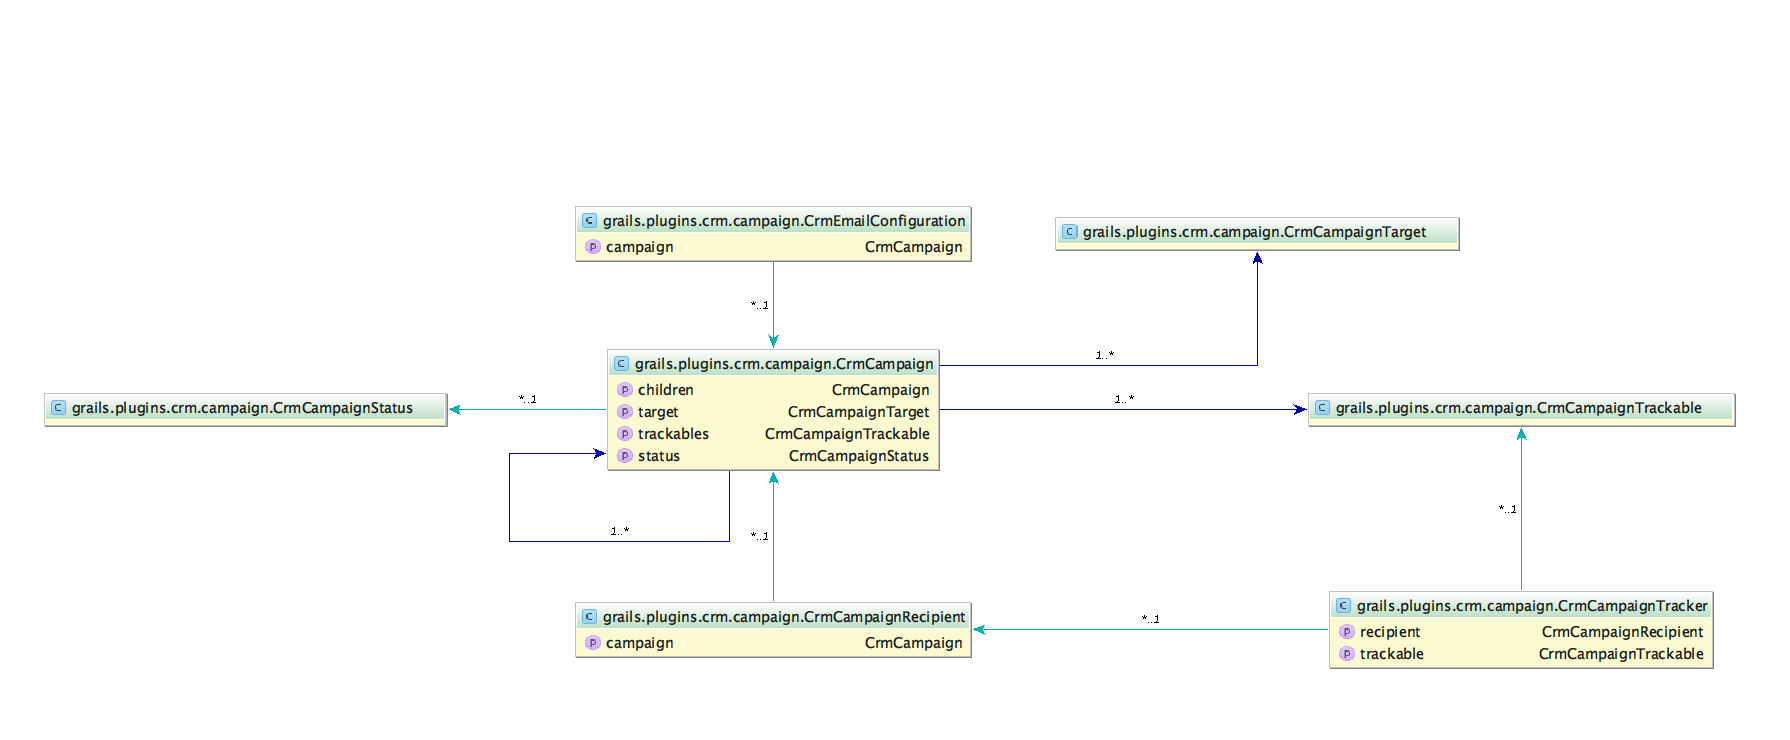
3.1. CrmCampaign
4. CrmCampaignService
Like most other GR8 CRM plugins this plugin have a main service with methods for creating, searching and updating campaigns.
4.1. Create a new campaign
CrmCampaign createCampaign(Map params, boolean save = false)
To create a new campaign you call the createCampaign(Map, boolean) method with a map of property values and a boolean
to indicate if the campaign should be persisted inside the method or if you want to persist it later yourself.
def c = crmCampaignService.createCampaign(...);

println "Campaign $c created"
4.2. Banner Campaign
A banner campaign is used when you want to display a banner image on your web page with a link that leads to a page with more information. A banner campaign uses crm-content plugin to store banner images.
def grailsApplication
def bannerCampaign (1)

final ApplicationContext ctx = grailsApplication.mainContext

final CrmCampaign parentCampaign = crmCampaignService.createCampaign(number: "banner",
        name: "Banners on home page", description: "Parent campaign for all banners on home page",
        true) (2)

def createCampaign = { name, desc, img, link -> (3)
    def c = crmCampaignService.createCampaign(parent: parentCampaign,
            name: name, description: desc, code: "ads", true)
    if(c.hasErrors()) {
        throw new RuntimeException("Cannot create campaign")
    } else {
        def image = ctx.getResource(img).file (4)
        image.withInputStream { is ->
            crmCampaignService.addCampaignResource(c, is, "banner.jpg", image.length(), "image/jpeg")
        }
        bannerCampaign.configure(c) {
          url link (5)
        }
    }
}
// Create three campaigns, one for each of our new amazing products.
createCampaign "Product X", "Our amazing new Product X...",
        "images/banners/product-x.jpg", "http://mywebshop.com/view/product-x"
createCampaign "Product Y", "Our amazing new Product Y...",
        "images/banners/product-y.jpg", "http://mywebshop.com/view/product-y"
createCampaign "Product Z", "Our amazing new Product Z...",
"images/banners/product-z.jpg", "http://mywebshop.com/view/product-z"| 1 | Inject the BannerCampaign bean so we can use it to configure our campaigns. |
| 2 | Create a parent campaign that group all banner campaigns. |
| 3 | Create a closure to make it easy to create sub-campaigns. |
| 4 | Banner images are located in web-app/images/banners so we can get them via ApplicationContext. |
| 5 | Each sub-campaign is configured with the link to more information. |
To display the three banners we created above we can call the images action in CrmCampaignResourceController
to get a list of images. In the following example we use Javascript and jQuery to add all images to a banner area
on our web page. When the visitor clicks on an image it will redirect the browser to the configured link.
$.getJSON("/crmCampaignResource/images?t=1&code=ads", function(data) { (1)
    var container = $("#banners");
    for(var i = 0; i < data.length; i++) {
        var banner = data[i];
        var $img = $("<img/>").attr("src", banner.uri).attr("alt", banner.title);
        var $link = $("<a/>").attr("href", banner.url).attr("target", '_blank')
                .attr("title", banner.title);
        $link.append($img);
        $container.append($link);
    }
});| 1 | Because GR8 CRM is always multi-tenant we must specify in which tenant our campaigns are stored (t=1). |
4.3. Information Campaign
If you develop a public facing site with GR8 CRM you can display different content depending on where your visitors come from. For example if they come via a link on Twitter you can display one type of content, if they come via Facebook you can display another type of content.
def twitter = crmCampaignService.createCampaign(number: "twitter-app-2016", code: "twitter",
    name: "Tweets", description: "Visitors that came to us via a tweet", true)
def text = """
<h3>Download our Twitter App</h3>
<div class="pull-right">
   <@link controller="download" action="index" query="id=twitter-app" class="btn btn-success">Download</@link>
</div>
<p>With our new Twitter app you can do amazing things...</p>
"""
crmCampaignService.addCampaignResource(twitter, text, "twitter-app.ftl", [contentType: "text/html")
With one or more campaigns (created above) we can use the <crm:campaign> GSP tag to render the text.
crm {
    campaign {
        landingParam = ['utm_source', 'campaign', '_c] (1)
        landingPages = [home: 'index'] (2)
        sessionParam = 'campaign' (3)
    }
}| 1 | A list of known campaign source query parameters. This list is used to lookup the right campaign. |
| 2 | The landing pages that will trigger campaign lookup, in this example it’s HomeController.index. |
| 3 | If a campaign is found a reference to it is stored in a HTTP session attribute called 'campaign'. |
<div class="well">
    <crm:campaign campaign="${request.session.campaign}" template="default-campaign.ftl"/> (1)
</div>| 1 | If the session attribute 'campaign' is non-null the text for that campaign is rendered. Otherwise a default text template is rendered using the 'crm-content' plugin. |
4.4. Product Discount Campaign
If you develop a web shop with the crm-product plugin you can configure product campaigns to offer discounts or
value-add products for your customers. The ProductDiscountCampaign handler is very flexible with lots of
configuration options.
The following example applies 10 % discount on "Product X" products if the customer lands on our home page or web shop and a campaign source query parameter has the value "twitter".
crm {
    campaign {
        landingParam = ['utm_source', 'campaign', '_c]
        landingPages = ['home|blog|webshop': 'index']
        sessionParam = 'campaign'
        productDiscountCampaign.round = true
    }
}def twitter = crmCampaignService.createCampaign(number: "twitter2016", code: "twitter",
name: "Promotion for twitter users", description: "Follow us on Twitter to receive a 10 % discount on Product X.")
productDiscountCampaign.configure(twitter) {
products = ['productXbasic', 'productXpro', 'productXultimate'] (1)
discount = 0.10 (2)
condition = 'any' (3)
}
campaign.save(failOnError: true)| 1 | Only apply discount on a limited list of products. |
| 2 | 10 % discount |
| 3 | The discount is applied without any amount threshold. If condition is a number the discount will only be applied if the total shopping cart value is higher than 'condition'. |
See ProductDiscountCampaignSpec.groovy for more examples.
4.5. Email Campaign
def emailCampaign (1)

def campaign = crmCampaignService.createCampaign(name: "Test campaign", true)
emailCampaign.configure(campaign) {
    subject = "Test"
    sender = "info@mycompany.com"
    parts = ['body']
    body = """<h1>Hello World!</h1>"""
} (2)
crmCampaignService.createRecipients(campaign, [[email: 'me@mycompany.com'], [email: 'joe.average@customer.com']]) (3)
crmEmailCampaignService.send() (4)| 1 | Inject the EmailCampaign bean so we can use it to configure our campaign. |
| 2 | Configure the email layout and other email parameters. |
| 3 | Add two recipients. |
| 4 | Start the campaign. This will send the email to the recipients. |
4.5.1. Open tracking
If you want to know if a recipient has opened the email you can include an invisible "beacon" image that when requested from the server notifies the campaign that the recipient has viewed the email. However this is not 100% accurate because most people today don’t show images automatically in their email clients. They have to manually force a download of remote content (images). But it can give you a hint about how successfull your campaign is.
To activate the tracking image add the following configuration parameter:
crm.campaign.email.track = true
This adds a tracking image to all outbound emails and you can see the result in the target group tab on the campaign.
4.5.2. Bounce Tracking (return-to-sender)
When you send out large amount of emails you must have a process to handle invalid email addresses and other type of
return-to-sender emails. The quartz job CrmEmailBounceJob helps you with that burden. It periodically scans the IMAP mailbox
that you used as sender or reply-to address. If it finds an error report from an external mail server
it looks up the recipient in your GR8 CRM database and marks it with error status.
Optionally it can tag the CrmContact instance with a tag that tells you that this contact’s email address it not valid.
Future email campaign can ignore contacts tagged as invalid. Or you can query and delete them from your address database.
crm {
    campaign {
        job.bounce.enabled = true
        email {
            bounce {
                imap.host = 'imap.googlemail.com'
                imap.port = 993
                imap.username = 'info@yourcompany.com' (1)
                imap.password = 'password' (2)
                imap.store = 'imaps'
                to = 'newsletter@yourcompany.com' (3)
                tag = 'wrong-email' (4)
                clearEmail = true (5)
                tenant = 1 (6)
            }
        }
    }
}| 1 | Your sender or reply-to address |
| 2 | GMail users, you can generate an app specific password in Google Admin Console |
| 3 | If the sender or reply-to address is an alias, specify the address here to filter messages on To: |
| 4 | Contacts will be tagged with this value, exclude or set to null if you don’t want to use tagging |
| 5 | If true the email property of the recipient will be set to null (to make it impossible to send email to this recipient again) |
| 6 | The tenant to process in a multi-teant environment |
5. Changes
- 2.4.6
-
New method CrmCampaignService#addRecipient(Map) that accepts a single recipient
- 2.4.5
-
When a campaign is copied, all attached resources (html, images, etc.) are now copied.
- 2.4.4
-
Better support for supplying custom model to email templates.
- 2.4.3
-
Fixed bug that caused the link between recipient and contact to be missing when sending emails.
- 2.4.2
-
Better configurability for the email campaign bounce tracker.
- 2.4.1
-
First public release (2.4.0 got corrupted when published to grails.org).
6. License
This plugin is licensed with Apache License version 2.0
7. Source Code
The source code for this plugin is available at https://github.com/technipelago/grails-crm-campaign
8. Contributing
Please report issues or suggestions.
Want to improve the plugin: Fork the repository and send a pull request.